This blog is now self-hosted
Doing a reset on the blog since the last time I posted was 2017. I'm taking the opportunity to learn some new stuff and set things up a little differently.


Doing a reset on the blog since the last time I posted was 2017. I'm taking the opportunity to learn some new stuff and set things up a little differently.
The biggest difference perhaps is that the blog is no longer hosted through a cloud provider on a server that I pay for. Rather I am now hosting it on the same computer that I am writing this on, so every time you hit refresh my computer is serving up the content you see. There's something cool about that to me.
The purpose of this post is to walk you through my thinking in why I did this, how I did it and perhaps even contribute to the open source community by providing a fully automated (read: edit some variables, configure port forwarding on a router manually and running one script) solution to doing this yourself.
Why would I choose to self-host the blog and what are the downsides?
Let's start with some of the cons, non-exhaustive:
- There are definite security concerns you need to consider in doing this and following any of the code I share. Any misconfigurations, lapses in software updates or plain ignorance can and will cause security breaches on my home network.
- I am now responsible for the software setup and maintenance of the server the blog is hosted on as well as the services running on the server. This can get annoying and there's a reason entire cloud provider businesses exist to remove this hassle.
- The blog uptime is tied to my computer uptime, so the blog will absolutely have periods of downtime when I choose to turn my PC off/some automated start up fails.
And now some pros:
- I like that I have complete control over the content, both from the blog and software setup perspective.
- There's something about my content sitting right next to me everyday that gives me a sort of mental push to create, learn and tinker more. For now, this is good for my mental health.
- I like the idea of decentralization and moving towards an internet where many of us can have similar setups instead of everything being served and controlled by big cloud providers.
What technologies did I use to set this up?
In part I wanted to do this to learn some new technologies that I have run into over the years but never got my hands really dirty with. With that said I did not want to re-invent the wheel and instead made it a goal to use as many already implemented solutions/services as possible. I've written my own version of some of the services used below and I was happy to move beyond implementation logic and more into contributing a one-ish click solution.
At a very high level my service infrastructure looks like this:
Operating System - Ubuntu on Windows 10
I used a Windows 10 PC as that is the device I have available to me, so not really a choice here. But what was cool here was seeing how far we have come with Windows Subsystem for Linux and how relatively easy it was to get Docker up and running with WSL2 (would obviously have been easier on MacOS or a Linux distro). To actually run my script I used an Ubuntu installation via WSL2 using Windows Terminal.
Orchestration - docker
The plan from the outset was to build this in a way that I can repeatedly tear down, restart the solution and share it with others - in a way that it can be run by them easily and reliably. I believe as long as you have Docker installed you should be able to run this. Please create a GitHub issue if I am wrong.
Lastly, I'll admit that I've been wanting to get my feet wet with Docker for a while and this seemed like a great use-case for it.
Web server - nginx
Until this project, I always thought this was pronounced n-JINX and not engine-X. I learnt how to write my first .conf file and use nginx as a reverse proxy to route traffic based on host name. Lots more to learn here and please be aware if you use my solution that this + port forwarding (below) are likely the parts I'm most nervous about being compromised by a bad actor.
Blogging framework - ghost
I have also switched over to using Ghost vs. my previous use of WordPress. I've already found the user experience to be a lot smoother and easier from the point and click admin panel perspective, but even more so from the perspective of having to inject some code to tweak the template that I am using. Ghost supports a lot more use-cases than what I am using it for, like comments, email newsletter, members etc. so check it out if you haven't before.
Checkpoint 1: Running + working blog in the web browser!
With the technologies above this point I have a working webserver and the blogging framework installed. What that means is that I can visit localhost in the web browser and view the blog!
However! The blog is only viewable on a web browser on the computer that I am doing the development/deploying on.
Firewall port forwarding - Manual configuration for now, automate via miniUPnP one day
Once I had everything running locally and could access my blog via localhost on the host I am deploying on, naturally the next step I wanted to take is access the blog from another device, like my phone.
To do this, instead of going to localhost in my browser, I could instead go to the public IP address assigned to me by my network provider. This IP address is obtainable in a few ways, e.g. running ipconfig in windows command prompt or simply googling "what's my IPv4 address".
However once I tried to do this, my browser was not able to load my blog. This is because home routers use a firewall to prevent external traffic from accessing your home network, and for very good reasons.
I chose to follow this path and took on the risk and bypassed the firewall by logging into my router's admin console and added a port forwarding rule to the private IP address of the computer hosting the blog.
Again, I wanted this solution to be fully or as near to it as possible so after some research I settled on the miniupnp client, which is a client that uses the Universal Plug and Play protocol to automate/remove the need to log into your router and mess with the port forwarding rules manually. Same risks, but automated.
I was able to get the automated solution working via command line in WSL1 but due to the architecture differences with the use of Hyper V in WSL2 I wasn't able to get the same automated solution working in WSL2. Maybe someone smarter than me can point me in the right direction here?
I recognize that it is safer to go through a tunnel of some sort here like ngrok or a virtual private server hosted elsewhere and I encourage others to do so if that fits their usage model. I placed a constraint on myself to use as few "centralized" services as possible. We can argue that LetEncrypt and pulling Docker images breaks that rule but I feel like I didn't break the rule as they aren't being used in the critical path, just for setup and maintenance.
Checkpoint 2: Available on the internet via public IP address! I now have the same blog that was only accessible on the machine I was developing/deploying on now available on the public internet - if you paste my IP Address into your web browser.
Domain name - namecheap, ddns-updater
Asking my friends to paste my IP address into their browsers to visit my blog is fun and all but the next immediate step I wanted to accomplish was to make this whole thing real and point my domain name (nkorai.com) at my self-hosted blog now.
I can do this by taking my IP address, logging into my domain name provider's console and adding an A record to my domain name that points to my public IP address. This is a completely acceptable solution if you have a static IP address.
The above solution does not work for me for 2 reasons:
- less important: I've been harping on about automation for this whole thing and logging into your domain name providers console to do this is not that
- more importantly and critically: ISPs do not (generally) assign static IP addresses to your home networks. Instead they dynamically assign and recycle IP addresses.
With a dynamic IP address I needed a solution that would update my DNS records in my domain name providers systems on a cadence to ensure my domain name stayed pointed at my website.
I found ddns-updater which seems to support a very thorough list of domain name providers and it comes with a UI to check up on the health of your dynamic DNS updating.
Checkpoint 3: Things are now very real! My domain name nkorai.com now points to my actual computer running my blog. Something about that was just so cool and satisfying to me, even after years of running cloud based services on servers for "real production environments" in my day job.
SSL - Let's Encrypt, gordonchan/auto-letsencrypt, certbot
Now that my blog is open to the public and anyone can visit it, I add a rule to my nginx configuration to automatically start directing anyone visit the http:// version of my blog to the https:// version. After this rule is added, my visitors start seeing this in their web browser:
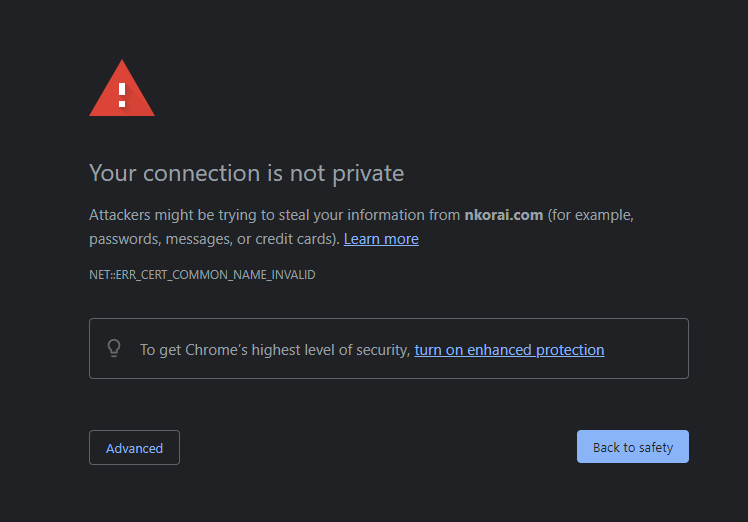
I obviously want to get rid of that but more than just being a bad customer experience, enforcing HTTPS is critical to me (and many other people), even on my static web content blog. In addition to the real reasons, as is the running theme, I also wanted to try it out something new by doing this in an automated fashion with a free and open service like LetsEncrypt - having only worked with doing this completely manually or automating it via cloud providers in the past.
gordonchan/auto-letsencrypt's wrapping of certbot was a perfect solution, down to the SIGHUP signal sent on successful validation which allowed my webserver to automatically restart vs asking the end user to manually restart the service.
Checkpoint 4: It's all come together and everything works! MY blog is now accessible from the public internet, via my domain name nkorai.com, with working SSL.
Massive dopamine launched straight into my brain receptors.
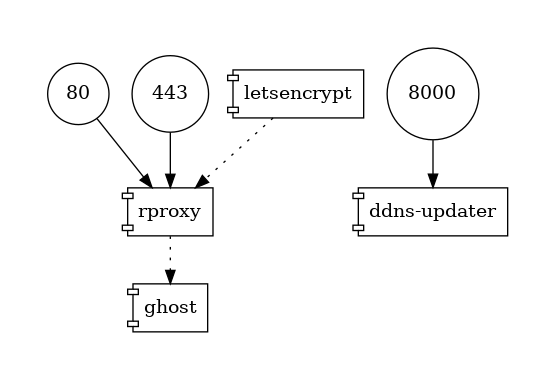
Now that we have walked through all the services, maybe a docker visualization with the interaction between containers via volumes would help provide a richer story:

How can I set this up for myself?
I have shared the code I used to do this on GitHub: https://github.com/nkorai/SelfHostedBlog
You'll have to follow the readme, generally the steps you'll have to take our:
- Install Docker, Ubuntu for Windows and enable WSL2 for virtualization
- Configure dynamic DNS on your domain name provider (mine is namecheap) and get your dynamic DNS password
- Configure your router port forwarding rules for port 80 and 443 (at your own risk)
- Replace my website hostname with yours and add your dynamic DNS password to the setup script
- Run the setup script
If you are more interested in learning the step by step process I took putting this together, the roadblocks I ran into and get more details, I plan on blogging a few more posts on how to get setup with this and what each of the services do in more detail.
Checkpoint 5: Build and share this in a way that anyone is able to quickly (ish?) get this up, running and self hosting their own blogs.
Other references
I used the following resources both as starting points and help to get me unstuck when I hit issues: